ManualUsingWebInterface
Prev: ManualBasicAdministration --- Up: UserManual --- Next: ManualAdministration
RT has a web interface that works in just about every web browser - including screen readers for the blind - and is easy to use. How easy? You're about to find out. Remember, though, that RT is very configurable; if you're reading this to learn how to use a local installation at your site, remember that your administrator could have made changes that will make things look differently than they do here; don't let it throw you.
RT has a powerful interface to create queries using TicketSQL, a SQL-like syntax for searching tickets. The output format can also be configured. i.e. which columns to show. This can be configured using the query builder or a plain text input in advanced mode.
If you see any unfamiliar terms in this chapter, look for them in the RT Concepts section of ManualIntroduction, or in RTGlossary.
This manual is being updated to 4.4; we're going to snip out references to things that were markedly different in older -- particularly pre-4.x -- releases. If you have one of those... you really need to think about upgrading.
Logging In
Your administrator will tell you where your login page is, and what username and (usually) temporary password to use. The login screen looks like this:
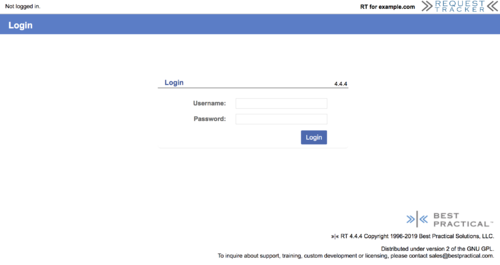
Type your username in the Username text box, type your password in the Password text box, and then click the Login button, or hit ENTER.
RT at a Glance (Home Page)
Immediately after logging in, you'll be looking at the home page, RT at a Glance.
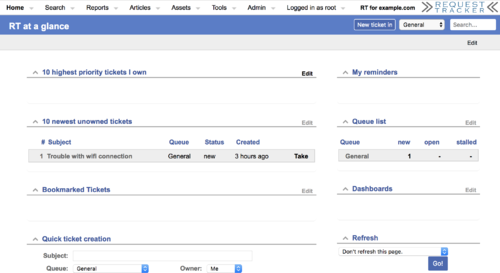
NOTE: You'll find that many items are clickable hotlinks in the RT interface, such as ticket ids and queues, but the default interface configuration does not highlight these using the usual blue color or underline. Move your mouse around; things which are links will get an underline when you hover the mouse over them. Clicking on these items takes you pretty much where you might expect it would.
Also, note that your installation may have been customized by the administrator, and because of that, things may be in different places than we describe here.
The main part of the page, called "RT at a Glance", will contain a collection of panels, each of which can be minimized, and some of which can also be edited.
By default, these are:
In the left column
- 10 highest priority tickets I own: This section displays what you need to do. Each ticket will display its id, subject, queue, and status from this page. Click any ticket's id or description to display its basic information page (see also the Tickets interface section of this chapter).
- 10 newest unowned tickets: Here you'll see the list of tickets which have been created, but not yet assigned to anyone, sorted with the newest ones at the top. Each ticket has an associated Take link which you can use to assign the ownership of the ticket to yourself, and start working on it.
- Bookmarked tickets: Here is a facility where you can bookmark any ticket while you're looking at it, no matter its queue or owner, by clicking on an empty star in the top right corner of the page. Tickets you've bookmarked in this way will be displayed in this panel.
- Quick Ticket Creation: This panel lets you enter the bare minimum of information about a new ticket, to create one quickly when necessary. If you need to enter more information about a new ticket, including things like CCs, select a queue from the top submenu of the page, and click the "New Ticket In" button; this will give you the complete New Ticket screen.
In the right column
- My Reminders - If you have set a reminder for yourself in a ticket, you will see the title of the reminder and which ticket it belongs to. Click on the title of the reminder to follow it.
- Queue List - This panel contains a list of all the queues you're permitted to access, logged in with the current user account. They're in alphabetical order, and show tickets in each status based on the queue lifecycle.
- Dashboards: The Dashboards panel (see ManualDashboards) will contain a list of any Dashboards which have been created for the entire RT installation, your user group, or your personally created dashboards.
- Refresh: This pulldown menu, on the lower right side of the screen, lets you select whether the homepage is automatically refreshed or not. The default is no. Other options are refreshing the page every 2, 5, 10, 20, 60, and 120 minutes. Click the Go! button to select the displayed auto-refresh delay.
This is the RT main menu. The options will expand into a menu tree as you select various tasks. Your current location in this tree will always be boldfaced. Some of these options may not be displayed if you do not have the appropriate rights.
- Home: the home page: where you are now. You can always get back to the home page by clicking Home in the upper left of the screen. You can even click this if you're on the home page, as an easy Refresh link.
- Search: clicking this brings you to the ticket search query builder page (see also Searching for tickets).
- Reports: This allows you to quickly create reports on tickets Resolved by owner, Resolved in date range or Created in a date range.
- Articles: clicking this takes you to Articles, RT's integrated knowledgebase.
- Assets: Assets allow you to keep an inventory of items that can then be linked to tickets as needed
- Tools: The options here allow you to view your daily progress, check your reminder and view any approvals you may need
- Admin: This link takes administrators to the section of RT where they can configure users, queues and scrips, and make global setup changes to the installation.
- Logged in as: This menu lets you configure RT for your personal tastes. You can also log out of RT here.
- New ticket in: Use this to quickly start creating a ticket (for more detail, see Creating a new ticket). Choose a queue from the drop-down menu and click the "New ticket in:" button to begin.
- Search: Type a search term in the text box and click the Search button to find tickets. This box can do some magic, for example you can type in a ticket id, and jump directly to that ticket. Check out ManualSimpleSearch for more on the magic and ManualSearchTickets for more ways to search tickets.
Tickets interface
The fundamental object in RT is the ticket; a ticket groups all of the information about, and transactions related to, an issue you're using RT to track.
First, you should know some of the various ways to navigate to an existing ticket:
- from the Home page, click a ticket subject under 10 highest priority tickets I own or 10 newest unowned tickets. Or, you can Take an unowned ticket, which has the extra side effect of assigning ownership to you.
- search for a ticket, from the search box on the Home page or by clicking Search in the top navigation bar, then click on the ticket.
- click a queue name on the Queue List panel and then click a ticket.
- clicking a ticket's URL from within an email message.
Display
Any way you navigate to a ticket, you'll arrive at that ticket's Display page first.
The Display view, the first of many possible views of the ticket, (see screenshot) provides an overview of the ticket.
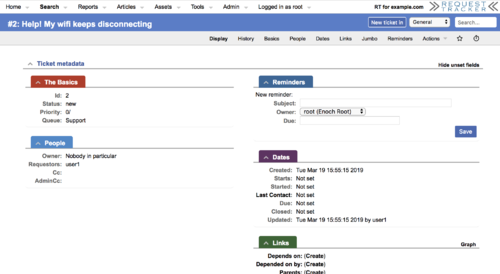
Two panes come up on the Display view: Ticket Metadata on top, and History below.
As you can see, it includes information like Basics, People, Reminders, Dates, and Links, each in it's own portlet.
The id and subject of the ticket is above the top command bar.
In the upper right corner of the main window, new tickets will offer by default (depending on user rights) the Actions: Reply, Comment, Forward, Open It, Resolve, Reject, Delete, Take, and Extract Article. Reply and Comment will be covered shortly, in the Replying and Commenting section. Resolve means to close a ticket because work on it is finished, Open will change a ticket's status to "open", Take makes you the ticket's owner, and Extract Article is part of RT's integration with the knowledgebase Articles.
If anyone owns a ticket, the Take option disappears; likewise, once a ticket is resolved, the Resolve option disappears. If a resolved ticket is reopened with the Open It option, Open It disappears and Resolve reappears.
The Display page sometimes has an Attachments portlet, which lists ticket attachments, organized by name and then by date.
History
This panel on -- or separate view of -- the ticket shows everything that's ever happened to the ticket, including comments, replies, attachments and status and ownership changes.
Basics
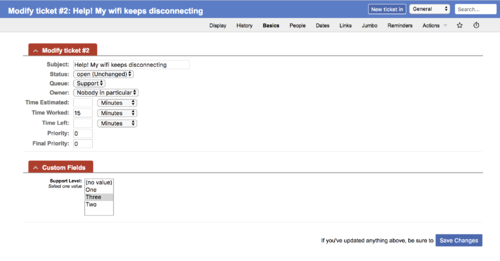
This is where you change the ticket's subject, status, queue, owner, time estimated, time worked, time left, priority, and final priority. A ticket's subject is what it sounds like; "time estimated","time worked" and "time left" refer to the (total) number of minutes worked on this ticket only. If you're unclear on status, queue, owner, or priority, refer to RT Concepts.
After changing information on the Basics page (or any other), don't forget to click the Save Changes button.
This is also the page where you can change values in a custom field. Your organization may create its own fields, and they come up on a ticket's Basics page. They work like any other field: you type things in them or select things from them. To create your own custom fields, see ManualAdministration.
Dates
People
To reach a ticket's People screen from within a ticket, click People on top submenu or, alternatively, click on the porlet's tab.
This page deals with a ticket's owner, requestor, Cc(s), Admin Cc(s) and optionally, Custom Roles. To review these roles, see RT Concepts.
There are two ways to add a watcher. If you know a potential watcher's email address, you can add one directly. Otherwise, you can search for them, then add whoever you've found.
To search for users before adding them as watchers:
- look under "Find people whose"
- choose Username, Email, Name, or Organization from the first drop-down menu
- choose matches, doesn't match, is, or isn't from the second drop-down menu
- type your search term in the text box
- click the Go! button
If RT finds a user, their username will appear in the Add new watchers area below. You've now found your user, and you're ready to configure them as a watcher.
To search for groups before adding them as watchers:
- look under "Find group whose"
- choose Name or Description from the first drop-down menu
- choose matches, doesn't match, is, or isn't from the second drop-down menu
- type your search term in the text box
- click the Go! button
If RT finds a group, the group name will appear in the Add new watchers area. You've now found your group, and you're ready to configure it as a watcher.
To add new watchers:
- locate the Add new watchers section of the page
- for each watcher you're adding, choose Requestor, Cc, or AdminCC from the Type drop-down menu
- type the new watcher's email address in the Email text box, if it's not already filled in
- click the Save Changes button
For each email address, RT will search for an existing user to match it. If there is no match, RT will create a new unprivileged user.
To remove a watcher:
- locate the Current Watchers section of the page
- check the box next to the watcher(s) to delete
- click the Save Changes button
To assign a ticket or change its owner:
- change Owner drop-down menu to the person of your choice
- click the Save Changes button
To change a ticket's owner to yourself, click Take from within a ticket, this only works if the ticket was assigned to Nobody. Once a ticket is taken, the Take option disappears from the ticket's interface. If the ticket already has an owner, you can click "Steal" instead to own it. There is no intermediate "Are you sure you want to do this?" page, but if you wrongly take a ticket, you can always give it back.
Links
Links in RT include Depends on, Depended on by, Parents, Children, Refers to, and Referred to by. If we just lost you, see RT Concepts.
To reach a ticket's Links page, from within a ticket, click on the Links portlet tab or Links on the ticket submenu.
You can add or delete links here, or merge duplicate tickets. In this screen shot, the links page for ticket #2, you'll see that ticket #2 is a child of parent ticket #3.
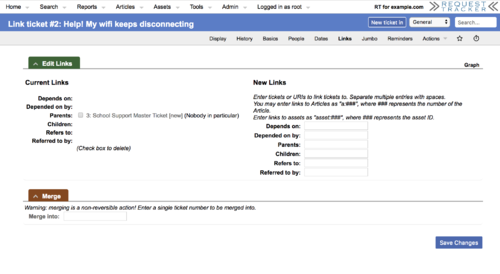
To merge two identical, duplicate tickets:
- look under Merge
- enter only one ticket number in the Merge Into: text box
- click the Submit button
If someone tries to use the ticket ID of a ticket you've merged into another one, RT automatically redirects to the correct, newly-merged ticket.
To add a link (Depends on, Depended on by, Parents, Children, Refers to, Referred to by):
- look under New Links
- enter ticket numbers (or other data) into the appropriate fields, separating multiple entries with spaces
- click the Submit button
To delete a link:
- look under Current Links
- check the box next to the link to delete
- click the Submit button
To add a link to an Article, see Replying and Commenting.
Jumbo
This page shows editable versions of the Basics, Dates, People, and Links (and Custom Fields if added) screens on one page, plus Update Ticket fields for adding comments or replies. This screen is useful if you must modify several aspects of a ticket at once. Be sure to click the Save Changes button when you're done.
Common tasks
Now that you know your way around RT's web interface, there are probably many tasks you can figure out on your own. However, we wanted to make sure you had a step-by-step guide to the most important and common tasks such as using RT's search functionality and working with tickets.
Searching for tickets
Creating a new ticket
To create a new ticket, start by selecting its queue:
- from any page, select the queue of your choice from the "New ticket in" drop-down menu on the top right of the screen
- click the New Ticket in button
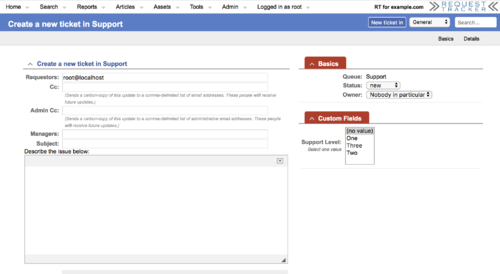
The next page will be the Create a new ticket page, defaulting to the Show basics view with the following fields:
- Queue: this should already be filled in for you.
- Status: generally, you'll leave this at the default, new. However, you might sometimes need to create a ticket to record a past occurrence or a problem that's already being worked on, so you might choose one of the other statuses from the drop-down menu.
- Owner: you can give the ticket an owner or leave this blank and let someone claim it later.
- You may also see some Custom Fields here if you created any and applied them to the queue
- Requestors: the default email address will be yours. Fill in any others if needed.
- Cc and Admin Cc: if you don't know what these are for, see RT Concepts.
- You may also see some Custom Roles here if you created any and applied them to the queue
- Subject and Attach file should look familiar to most email users and work basically the same way.
- Describe the issue below means you should explain why this ticket exists.
If you click Details from the top submenu, you'll be brought to the optional but potentially useful fields Priority, Final Priority, Time Estimated, Time Worked, Time Left, fields for dates (Starts and Due), and fields for each link (Depends on, Depended on by, Parents, Children, Refers to, Referred to by). These, too, are explained in RT Concepts.
When you're done filling in fields, click the Create button to make the ticket.
Replying and commenting
There are two ways you can respond to a ticket. By default, a reply is public and a comment is hidden from the requestor. Comments and replies are listed permanently under the ticket's History.
To say something about a ticket, first make sure you are within one of the ticket's pages (Display, History, Basics...) then click Comment or Reply in the Actions menu at the upper right of the page. To quote the text of an existing comment or reply inline, click Reply or Comment next to an existing reply/comment, from within the ticket's History (see screenshot).

On the resulting Ticket Update page, you'll see drop-down menus for Status and Owner. You probably won't need to change the defaults here.
There will also be a text box for how many minutes the ticket has been worked on. Fill this in if you want to or if you are supposed to be logging your time.
The Update Type drop-down menu will be automatically set to Comments (Not sent to requestors) or Response to requestors, depending on whether you clicked Comment or Reply as your first step. You can select the other option if you've changed your mind. As a visual aid, the message box will be yellow for comments and red for replies.
As for the other fields, we'll assume you have a working knowledge of email. RT correspondence has some fields that should be familiar to email users, such as Subject, CC, BCC, Attachments, and Message. The Subject field may be automatically filled in with the name of the ticket.
NOTE: email addresses in the CC and BCC fields of replies and comments will not automatically receive future updates.
Enter your comment or reply in the Message field, and when everything's done, click the Submit button.
You'll be brought back to the ticket's Display page, with a status message on top that says your comment or reply has been sent/recorded, or that there is a problem and it hasn't.
To add a signature that will appear by default at the bottom of all your comments and replies:
- click Logged in as -> Settings -> About Me from the top navigation bar
- type your (preferably short) signature in the Signature field
- click the Save Preference
Reply and comment with Articles
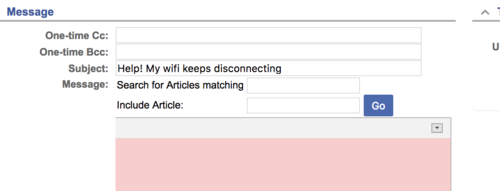
Articles is RT's knowledgebase system. If you are using Articles, you should know that when you reply to or comment on tickets in RT, you can search for and include (editable) Articles in the reply or comment. The ticket will now have a new link: Refers To (article of your choice). This screen shot shows the relevant part of the Reply or Comment screen, located above the Message box of the page:
To find an Article to include in the reply or comment, enter a search term in the "Search for Articles matching" text box and click the Go button. Assuming there are search results, click the Go button next to the article you'd like to include.
If you know the name or id of the article you'd like to include, enter it in the Include Article text box and click the Go button.
Modifying a ticket
Listed alphabetically by item that could be changed:
- dates:
- click on the Dates portlet or menu item on ticket display
- type the new date in the
StartsorDuetext box,StartedandLast Contactcan also be manually updated - click the Save Changes button
- history: a ticket's history cannot be changed.
- owner:
- from within a ticket's People page, change
Ownerin drop-down menu to the person of your choice - click the Save Changes button
- from within a ticket's People page, change
- priorities:
- from within a ticket's Basics page, type a new number in the
Priority/Final Priorityfields - click the Save Changes button
- from within a ticket's Basics page, type a new number in the
- queue:
- from within a ticket's Basics page, select a new item from the
Queuedrop-down menu - click the Save Changes button
- NOTE: that when you change a ticket's queue, queue-specific values such as custom fields will disappear. They will not be deleted, but they will be hidden.
- from within a ticket's Basics page, select a new item from the
- status:
- from within a ticket's Basics page, select a value from the
Statusdrop-down menu - click the Save Changes button
- from within a ticket's Basics page, select a value from the
- subject:
- from within a ticket's Basics page, type new data in the
Subjectfield - click the Save Changes button
- from within a ticket's Basics page, type new data in the
- time fields:
- from within a ticket's Basics page, type a new number in the
Time Estimated/Time Worked/Time Leftfields - click the Save Changes button
- from within a ticket's Basics page, type a new number in the
Modifying people
To assign a ticket or change its owner:
- from a ticket's People page, change Owner in drop-down menu to the person of your choice
- click the Save Changes button
To add new watchers:
- from a ticket's People page, locate the "Add New Watchers" section of the page
- choose Requestor, Cc, AdminCc or any Custom Role from the Type drop-down menu
- type the new watcher's email address in the Email text box
- add up to two more watchers, for a total of up to three
- click the Save Changes button
To remove a watcher:
- from a ticket's People page, locate the Current Watchers section of the page
- check the box next to the watcher(s) to delete
- click the Save Changes button
Modifying Links
To add a link (Depends on, Depended on by, Parents, Children, Refers to, Referred to by):
- from within a ticket's Links page, look under New Links
- enter ticket ids (or other data) into the appropriate fields, separating multiple entries with spaces
- click the Save Changes button
To delete a link:
- from within a ticket's Links page, look under Current Links
- check the box next to the link to delete
- click the Save Changes button
To merge a duplicate ticket into an identical ticket:
- from within a ticket's Links page, look under Merge
- enter only one ticket id in the Merge Into: text box
- click the Save Changes button
If someone tries to use the ticket ID of a ticket you've merged into another one, RT automatically redirects to the correct, newly-merged ticket. Merging tickets also merges all ticket data such as watchers, links, and history.
Updating many tickets at once
Sometimes, you may need to make a change to several tickets at once. There's an easy way to do this:
- locate the tickets you want (see Searching for tickets)
- from the results page, click "Bulk Update" from the top submenu
- you'll be sent to a Bulk ticket update page where you can add a comment or reply to all the tickets, or change the tickets' owner, requestors, Cc, Admin Cc, subject, priority, queue, status, and various date fields. The power!
- click the Update button
Resolving a ticket
If a ticket has been completed and doesn't need any more work, you can resolve it by clicking Resolve in Actions menu of ticket's pages (Display, History, Basics...).
This takes you to a comment form (see Replying and Commenting) but sets the Status drop-down menu to Resolved.
You're encouraged to use the Message text box to explain why you're resolving the ticket.
When you're done, click the Update Ticket button.
You'll be brought to the ticket's Display page and told the comment has been recorded and ticket has been resolved (or not, if there is a problem).
Changing your own user information
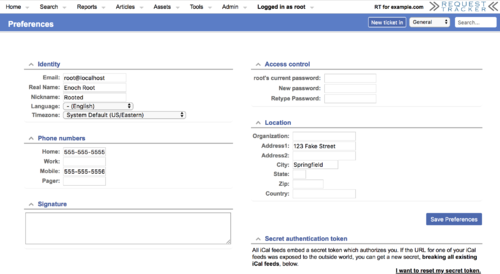
To change your own name, email address, phone numbers, location, signature or password:
- in the upper right of the screen, click Logged in as -> Settings -> About Me
- type new information in the desired fields
- click the Save Preferences button
NOTE: You'll need the right "ModifySelf" to view this page and make changes.
Groups
Users can grant their rights to others by creating a group and delegating the rights to the members of that group. This is convenient if you're going on vacation or need to pass the buck for any reason.
To view existing groups, go to Admin -> Groups -> Select -> [select group name]
To make a new group:
- go to Admin -> Groups -> Create
- type your group's name and description in the
Name:andDescription:text boxes - click the Create button
To add members to a group:
- click the name of a group
- click Members from the top submenu
- select user(s) or group(s) from the Add members are
- click the Modify Members button
To delete members from a group:
- click the name of a group
- click Members from the top submenu
- check the box next to the user(s) or group(s) to delete
- click the Modify Members button
To change a group's name or description:
- click the name of a group
- make changes
- click the Save Changes button
To disable a personal group:
- click the name of a group
- clear the Enabled checkbox
- click the Save Changes button
Unlike disabled users and queues, disabled groups will still be visible in listings. That removes a step from the process of re-enabling them when necessary.
To re-enable a group:
- click the name of a group
- check the Enabled checkbox
- click the Save Changes button
Rights
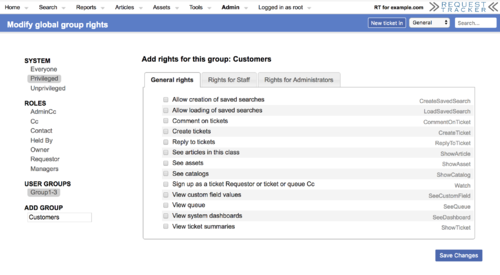
Once you have a group, you can grant rights.
- In order to delegate rights, you'll need to have the right "ShowConfigTab", which allows you to view the Admin menu in the top navigation bar
- If you've been granted a right globally, you can't delegate it for just one queue and vice versa.
To grant rights to a group:
- go to Admin -> Global -> Group Rights
- on the left side of the page, select a system group, role, or user group listed, or search for a group under "Add Group"
- rights are grouped by "General Rights", "Rights for Staff" and "Rights for Administrators", these are suggested rights, but you may grant whichever from any of the tabs
- check the box(es) next to the right(s) you'd like to grant
- click the Save Changes button
To revoke rights on a group:
- go to Admin -> Global -> Group Rights
- on the left side of the page, select a system group, role, or user group listed, or search for a group under "Add Group"
- uncheck the box(es) next to the right(s) you'd like to revoke
- click the Save Changes button
Logging out
You can leave yourself logged into RT without breaking anything, but logging out is a good habit to get into for security purposes. Logging out is standard:
- click Logged in as -> Logout in the top navigation bar
Some RT configurations don't have a Logout button, so don't panic if you don't see one.
Prev: ManualBasicAdministration --- Up: UserManual --- Next: ManualAdministration